


(截至2024/03/17 15:27:56)本文仍在编辑中,内容可能不完整
1 前言
对于计算机视觉的目标检测领域而言,在检测任务中,我们需要同时预测物体的类别和位置,因此需要引入一些跟位置相关的概念。
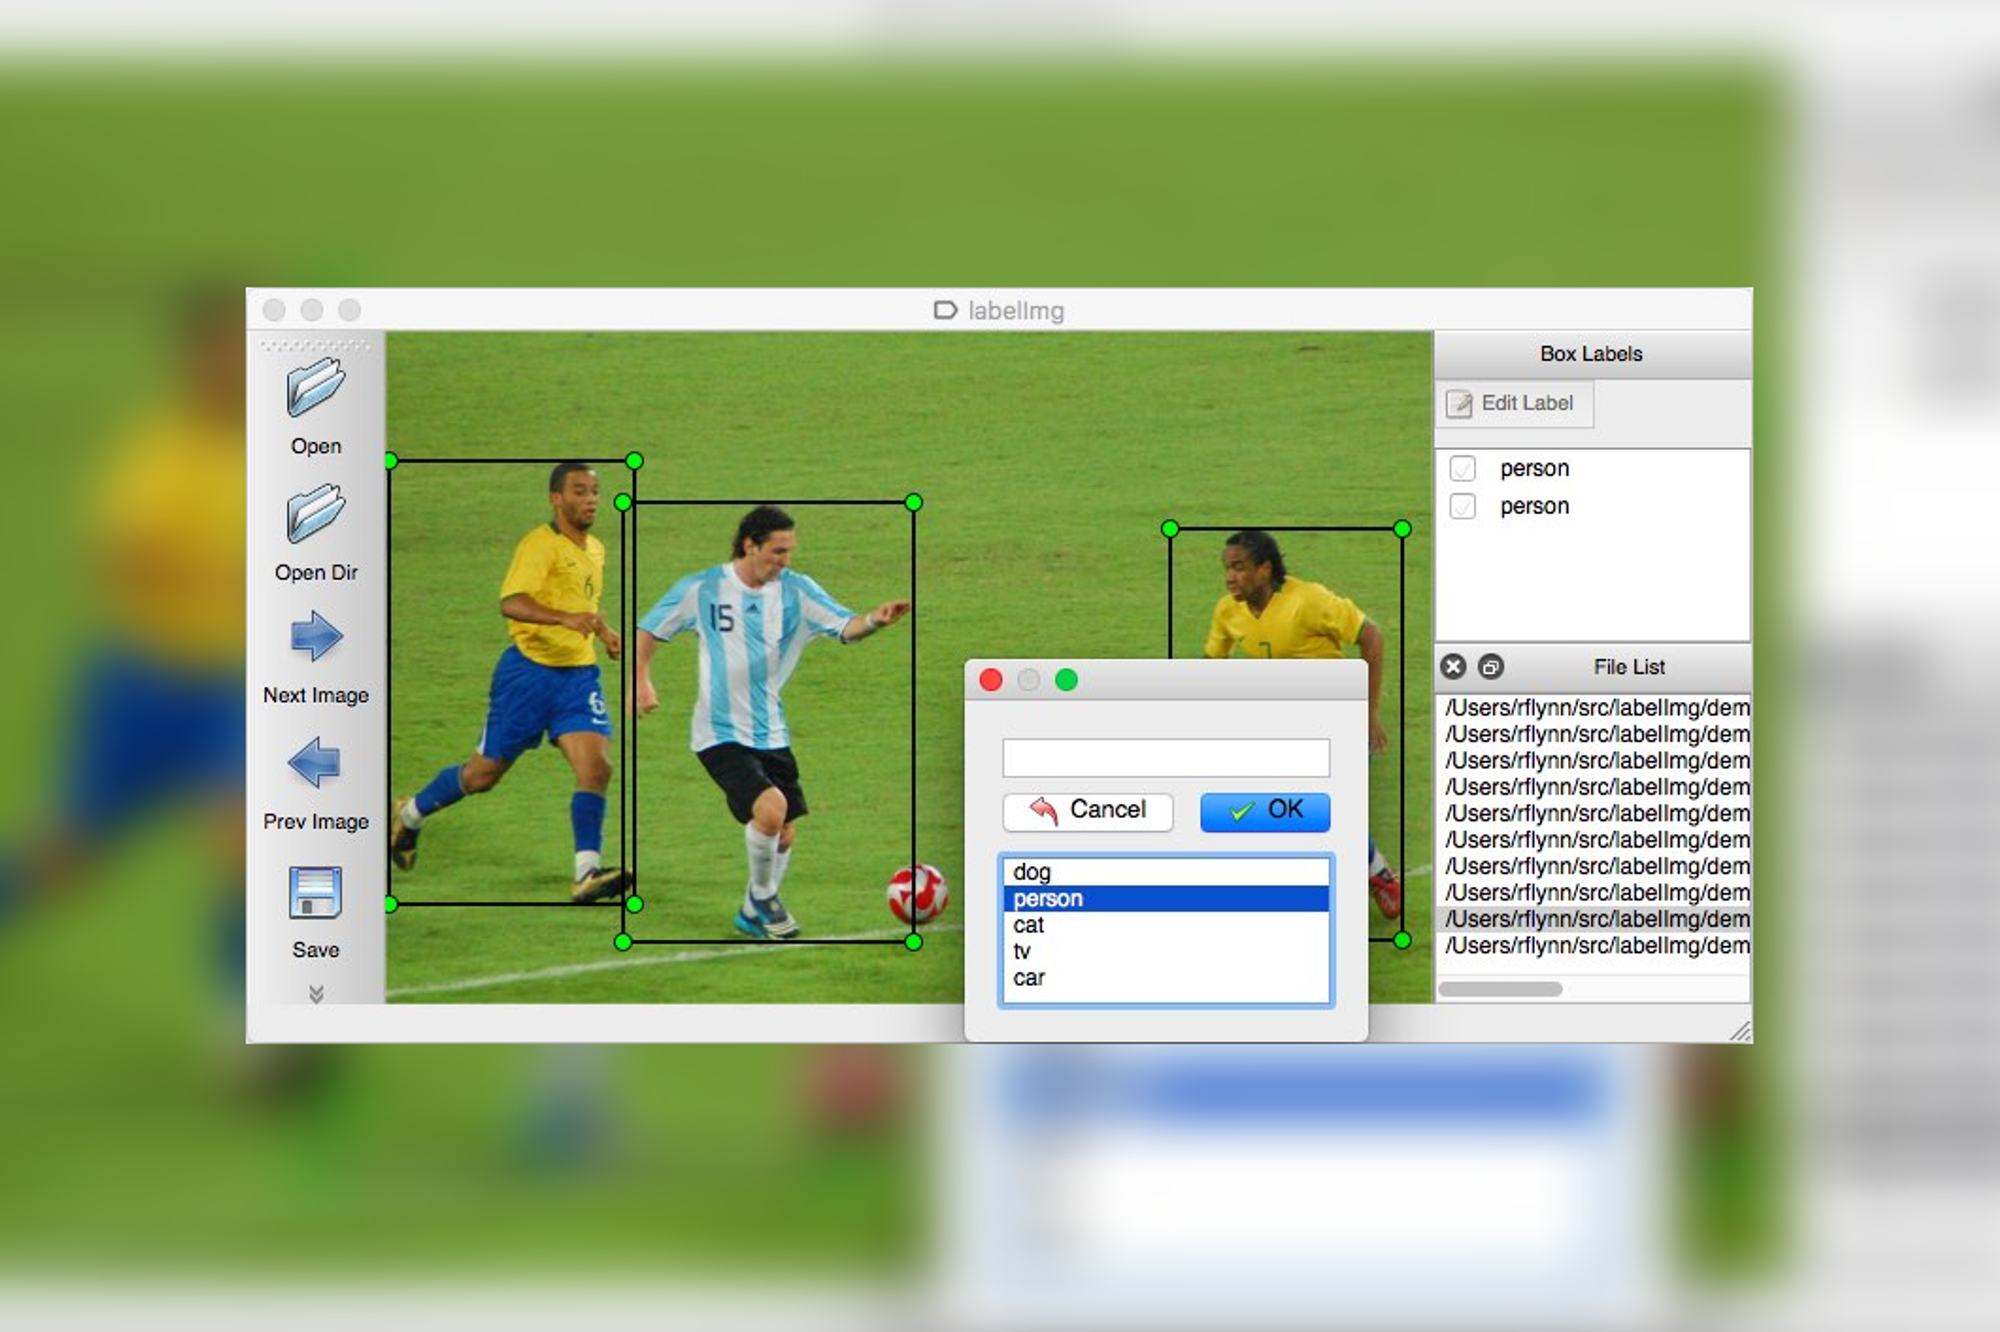
通常使用边界框(
bounding box,bbox)来表示物体的位置,边界框是正好能包含物体的矩形框,如 图1 所示,图中3物体分别对应3个边界框。

2 BoundingBox的常见表示格式
多数情况下,图片坐标的原点在左上角,X轴向右为正方向,Y轴向下为正方向。
下文提到的两种表示法均适用此原则
xyxy表示法(类VOC格式)
每行表示一个目标对象,包含了其边界框BBox的左上角和右下角的坐标,以及目标类别。
该表示法用两个坐标
BBox的左上角和右下角的坐标表示,故称为xyxy表示法目标检测常用的格式之一Pascal Voc 格式正是采用这种表示方法。文件格式为xml
# xyxy表示法格式 示例

# 每行对应一个目标对象
# x1 y1 x2 y2 class_id

483 234 518 261 1
271 227 307 257 2
265 165 297 189 3
311 456 344 496 4
107 313 165 358 5
485 390 513 426 6
201 525 237 551 3
- (x1, y1) 是边界框左上角的坐标, (x2, y2) 是边界框右下角的坐标
- class_id为类别编号,根据目标数量,从1开始编号
xywh表示法(类YOLO格式)
与xyxy表示法类似,每行表示一个目标对象,每个目标对象用5个参数确定。
该表示法用1个坐标
BBox的中心坐标表示,再加上边界框的宽度width高度height两个参数,故称为xywh表示法.目标检测常用的格式之一 YOLO标注 格式正是采用这种表示方法。文件格式为txt
# YOLO标注格式 示例

# 每行对应一个目标对象
# class_id x_center y_center width height

0 0.73359375 0.64375 0.0375 0.0390625
2 0.8140625 0.69296875 0.02578125 0.03203125
4 0.81640625 0.76640625 0.04609375 0.0953125
7 0.74453125 0.7453125 0.03984375 0.13046875
4 0.47265625 0.7578125 0.046875 0.07890625
5 0.815625 0.8078125 0.06484375 0.26171875
5 0.73515625 0.790625 0.0625 0.33203125
- class_id为类别编号,根据目标数量,从0开始编号。如果不区分目标物类别,只是实现多目标检测功能的话,那么所有的类别编号均为0。
- x_center为边界框中心点的横坐标
- y_center为边界框中心点的纵坐标
- width为边界框高度
- height为边界框高度

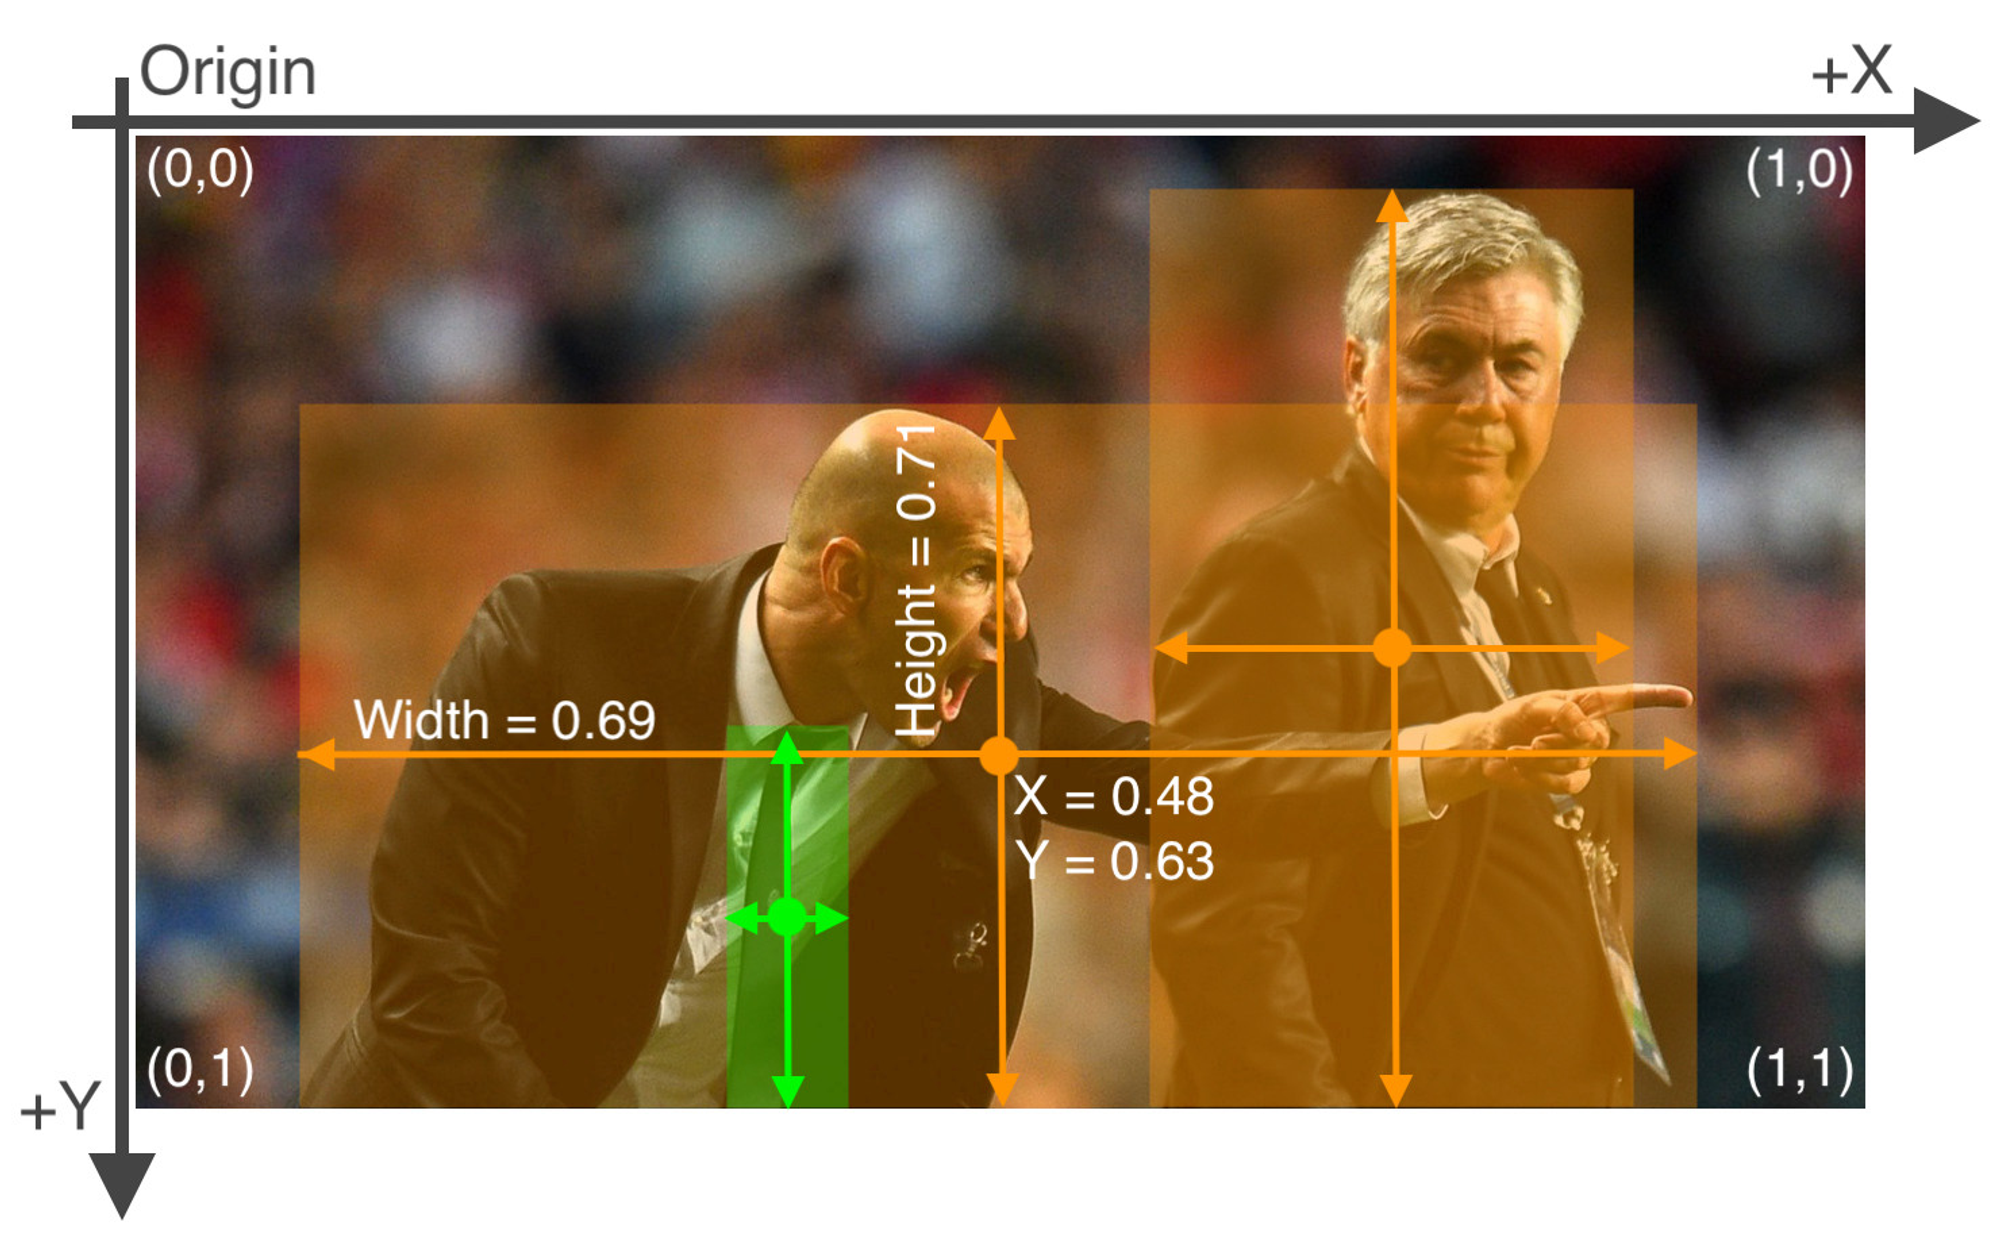

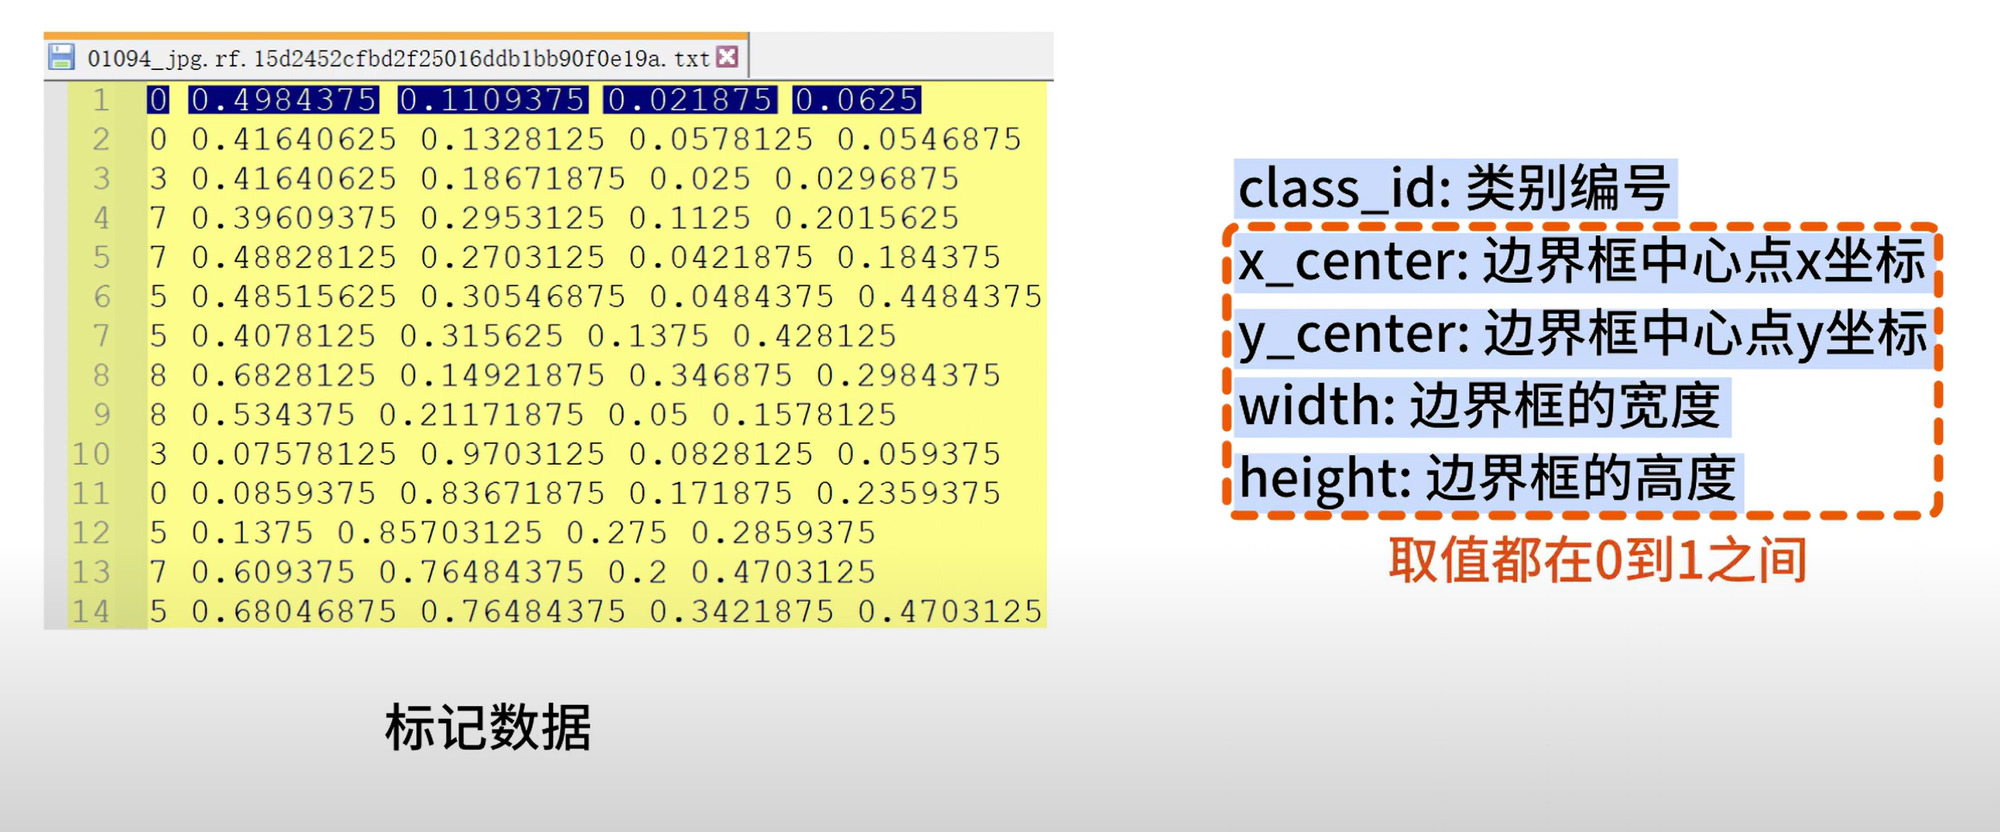
通过以上示例我们可以注意到,除了第1个类别编号,剩下4个参数的数值都介于0到1之间。
这是因为这四个参数都进行了归一化的处理,这是在处理YOLO标注格式时需要注意的地方。
3 格式转换的Python实现
了解了xyxy表示法与xywh表示法的异同,根据两者间的联系,我们就能明确转换思路。
用Python就能简单地实现批量的转换。
以下是格式转换的python示例代码,仅供参考
import os

def convert_annotation(txt_file, image_width, image_height):
    annotations = []

    with open(txt_file, "r") as f:
        lines = f.readlines()
        for line in lines:
            parts = line.strip().split(" ")
            class_name = parts[-1] - 1  # 最后一个元素是类别名称
            x1, y1, x2, y2 = map(float, parts[:4])  # 前四个元素是边界框的坐标

            # 计算目标对象的中心点和宽高
            x_center = (x1 + x2) / 2.0 / image_width
            y_center = (y1 + y2) / 2.0 / image_height
            width = (x2 - x1) / image_width
            height = (y2 - y1) / image_height

            annotations.append(f"{class_name} {x_center} {y_center} {width} {height}")

    return annotations

def main():
    data_dir = "path/to/your/dataset"
    output_dir = "path/to/output/yolo/format"
    image_width = 640
    image_height = 640

    for txt_file in os.listdir(data_dir):
        if txt_file.endswith(".txt"):
            image_name = os.path.splitext(txt_file)[0]
            annotations = convert_annotation(os.path.join(data_dir, txt_file), image_width, image_height)
            with open(os.path.join(output_dir, image_name + ".txt"), "w") as f:
                for annotation in annotations:
                    f.write(annotation + "\n")

if __name__ == "__main__":
    main()
参考资料
[3] Tang S ,He F ,Huang X , et al.Online PCB Defect Detector On A New PCB Defect Dataset.[J].CoRR,2019,abs/1902.06197
Preview: